Cooking On The Ranch

  • Home
  • About
  • Recipe Roundup
  • Contact Me
  • Join Community
menu icon
go to homepage
  • Home
  • Soups, Stews, & Chilis
  • About
  • Recipe Roundup
  • Contact Me
    • Facebook
    • Instagram
    • Pinterest
  • search icon
    Homepage link
    • Home
    • Soups, Stews, & Chilis
    • About
    • Recipe Roundup
    • Contact Me
    • Facebook
    • Instagram
    • Pinterest
  • ×
    Home

    Smoky Oven Brisket Recipe with BBQ Sauce

    September 24, 2015 By Lea Ann Brown 22 Comments

    Oven brisket served with baked potato and fried cabbage.

    Learn How To Cook A Brisket In The Oven. It’s Easy. This is an oven brisket recipe that’s simple with seasoning yet flavored with perfection. Using Liquid Smoke and cooked low and slow in the oven you won’t miss the barbecue grill or smoker. Finished with BBQ Sauce this is a super easy recipe that’s big on flavor.

    And if you’re looking to cook a brisket in the crock pot, take a look at my Coca Cola Brisket recipe. Put your slow cooker to work for this fun, easy and unique with flavor brisket recipe.

    sliced Oven brisket served with baked potato and fried cabbage.

    How To Cook A Brisket In The Oven

    You don't need a smoker, or a secret rub to make a great brisket. With simple pantry spices, a touch of Liquid Smoke to mimic smoke flavor, and a low-and-slow bake, you can get tender, smoky, flavorful brisket right from your oven.

    This easy oven brisket starts with a dry rub of celery salt, garlic powder, onion powder, and Liquid Smoke.

    Note: Be prepared to start the brisket the day before cooking. After an overnight rest in the fridge will allow the dry rub and liquid smoke flavors to penetrate the meat. It's then brushed with Worcestershire and baked low and slow until it's fall-apart tender.

    Inspired by a beloved family recipe from Helen VenJohn and the Bergkamp family cookbook, this method proves you can make incredible brisket, tender every time, no smoker required.

    Table of contents

    • How To Cook A Brisket In The Oven
    • Step by Step Instructions … It’s So Easy
      • Before Cooking
      • Cooking Brisket
    • Tips For Success
    • Brisket Serving Size – How Much Brisket Per Person
    • Questions You May Have
    • Resting, Slicing and Serving
    • What To Serve With It
    • Make Ahead, Storing Brisket And How To Reheat Brisket
    • Oven Brisket Recipe with BBQ Sauce
    • More Main Course Beef Recipes You Might Like
    Ingredients to make oven brisket.
    • Brisket. Choose a 5 – 7 pound brisket.
    • Worcestershire Sauce: Tangy, savory, sweet and salty, Worcestershire adds a beautiful layer of flavor to this oven brisket.
    • Liquid Smoke: Liquid smoke is a flavoring agent made by burning wood chips then capturing that flavor in a liquid substance. Liquid smoke has a strong smoky flavor and is used to bring enhance that outdoor smoky to food.
    • Seasonings: Kosher Salt, freshly ground pepper, celery salt, onion powder and garlic powder.
    • Optional: This oven brisket is beautiful in flavor without it, but you can add BBQ Sauce at the end of the cooking time. I always do. Use your favorite brand or make homemade bbq sauce, like this recipe from my Mom’s BBQ Meatballs.

    Step by Step Instructions … It’s So Easy

    Before Cooking

    Seasoning a brisket to bake in the oven.
    Adding liquid smoke to a brisket for oven baked brisket.
    1. Step 1: Place the brisket in a roasting pan, fat side down. Sprinkle on the celery salt, onion powder and garlic powder and rub it in a bit.
    2. Step 2: Drizzle on the liquid smoke.
    Oven brisket in a roasting pan covered with aluminum foil.
    1. Step 2: Cover the pan tightly with aluminum foil. Refrigerate it for 24 hours before baking.

    Cooking Brisket

    Bake at 275 degrees for 5 hours. This will allow the internal temperature to reach 190 degrees.

    Slicing oven brisket across the grain.
    Drizzling bbq sauce on top of oven brisket.
    1. Step 4: Remove the brisket from the roasting pan. Tent the meat and let it rest for 10 – 20 minutes, then slice against the grain.
    2. Step 5: Return the sliced brisket to the roasting pan, and drizzle on the BBQ sauce. I used about one cup of sauce as to not overwhelm the flavor the brisket. Cover again with the aluminum foil and cook for 30 more minutes.

    Expert Tip: Larry, over at Big Dude’s, a brisket expert, adds this about oven baked brisket. “Every piece of brisket is different and cooks differently so it’s hard to use a single cooking time and temperature for all of them.  It is also a piece of meat with a very small window of just right and it goes from tough (under cooked) to dry (over cooked) very quickly.  Nearly all pro-brisket cooks monitor the internal temp until it gets to about 195* then use the prob test – when a probe slides in and meets little resistance (like room temperature butter) its done.”  

    Tips For Success

    • Don’t be tempted to raise the temperature to rush the cooking time. Your oven brisket will turn out tough. Roasting at a low oven temperature allows the fats to break down slowly, tenderizing the meat during this process.
    • Before seasoning and cooking, find the grain and slice a small corner off the brisket. This will help you find the direction of the grain after it’s cooked = easier slicing decisions.

    Brisket Serving Size – How Much Brisket Per Person

    Briskets shrink as they cook. Take for instance, a five pound brisket will shrink to about 3 ½ pounds. Plan for ½ pound of uncooked brisket per person. So a five pound brisket will serve 10 people. I like a lot of leftovers, so I usually seek out a 7 pound brisket.

    Questions You May Have

    How Long Does It Take To Cook Brisket In The Oven?

    A 5 – 7 pound brisket, cooked at 270 degrees will take about 5 hours. After the 5 hour cook time, the BBQ sauce is added and it’s back to the oven just long enough to heat the sauce. A probe thermometer should indicate the internal temperature to be 190 degrees.

    How Long To Cook A Small Beef Brisket?

    If you purchase a 2 – 3 pound brisket, use a digital probe thermometer to monitor the internal temperature. Once you add the sauce, continue to bake until the temperature probe alerts you of the proper temperature.

    Resting, Slicing and Serving

    Do You Need To Let A Brisket Rest? All meat benefits from a rest after cooking. Once out of the oven, remove it to a cutting board and let it rest, tented with the foil for about 10 – 20 minutes. Then slice, add the bbq sauce and return to oven. Resting allows the meat juices to redistribute. The result is a more tender piece of brisket.

    Slice Against The Grain: Very important! Meat cuts like brisket, flank steak, skirt steak or even flap steak have muscle fibers that run in one direction. It’s crucial to cut this type of meat against the grain, meaning across the grain. This will shorten the fibers making it tender to chew. If you don’t follow this rule, you’ll have pieces of meat that are simply impossible to break down with your teeth.

    What To Serve With It

    I can’t think of a better meal than beef, potatoes and a vegetable. Serve oven brisket with these Garlic Butter Slow Cooker Baked Potatoes. Or a make ahead potato salad like this Old Fashioned Potato Salad.

    Any vegetable is a good choice. May I recommend Honey Butter Skillet Corn, Brown Sugar Green Beans with Bacon, or during the Fall months this Rode Kool braised red cabbage recipe.

    If you want a more rustic feel meal, serve this oven brisket with these Slow Cooker Cowboy Beans.

    Got leftovers? Make simple brisket tacos or BBQ Brisket Pizza.

    Make Ahead, Storing Brisket And How To Reheat Brisket

    • Make Ahead: Need to make a brisket in advance? This oven brisket can be made a few days in advance. Cook the brisket, let it cool, then store in the refrigerator still sealed with foil. To reheat, preheat your oven to 300 degrees F. Left the foil and pour about one cup of beef broth over the brisket. Place the pan in the oven and reheat for about 45 minutes or until the internal temperature reaches 165 degrees. Let the meat rest for about 10 minutes before slicing.
    • Storage: Store any leftover brisket, wrapped tightly in the refrigerator. I like to wrap in in parchment paper, followed by a layer of aluminum foil. It will keep in the refrigerator for up to 5 days.
    • Reheat: To reheat, preheat your oven to 300 degrees. Place some slices of brisket in foil and reheat for 15 – 20 minutes. You can place the foil packet of brisket directly on the oven rack, or on a sheet pan. I don’t recommend reheating cooked brisket in the microwave as it will compromise the tender texture.

    Oven Brisket Recipe with BBQ Sauce

    I hope you give this smoky oven brisket recipe a try. There’s so much hands-off time, this is an easy way to enjoy a brisket without the fuss.

    It’s a great recipe for entertaining, so instead of cooking individual steaks, make it easy on yourself and prepare one large cut of beef. It will save you time and it will save you money, without sacrificing flavor.

    More Main Course Beef Recipes You Might Like

    • Sliced grilled Flank steak and chimichurri on a white platter.
      Flank Steak With Chimichurri Sauce
    • Pot roast dinner with potatoes, carrots and gravy.
      Old Fashioned Sunday Pot Roast Dinner With Gravy
    • Slow cooker beef tips with gravy plated with mashed potatoes and broccoli.
      Slow Cooker Beef Tips with Gravy
    • Beef tournados with red wine mushroom sauce served with mashed potatoes and green beans
      Beef Tournedos Steak with Red Wine Mushroom Sauce

    And don’t miss my category for Beef Recipes. You’ll find lots of steak, burger and meatloaf recipes. Including the most popular on my site for Beef Tagliata. An easy Italian Steak recipe that will win your heart.

    Oven brisket served with baked potato and fried cabbage.
    Print Recipe
    5 from 3 votes

    Smoky Oven Brisket Recipe with BBQ Sauce

    This is an oven brisket recipe. How to cook a beef brisket low and slow in the oven so that it's oh so tender and oh so delicious. 
    Prep Time10 minutes mins
    Cook Time5 hours hrs 15 minutes mins
    Over night Marinade1 day d
    Total Time1 day d 5 hours hrs 25 minutes mins
    Course: Main Course Beef
    Cuisine: American
    Servings: 14
    Calories: 526kcal
    Author: Lea Ann Brown

    Equipment

    • Roasting pan
    • Digital probe thermometer

    Ingredients

    • 5 – 7 pounds beef brisket
    • 3 Tablespoons Liquid smoke
    • 1 Tablespoon Garlic powder Or garlic granules
    • 1 Tablespoon Onion powder
    • 1 Tablespoon Celery salt
    • 1 teaspoon Kosher salt
    • ½ teaspoon Freshly ground black pepper
    • 3 Tablespoons Worcestershire sauce.
    • 1-2 Cups BBQ Sauce

    Instructions

    • Place brisket in a roasting pan and sprinkle with garlic powder, onion powder and celery salt. Rub the seasonings into the meat a bit. Drizzle on the Liquid Smoke Cover tightly with aluminum foil and allow to stand in the refrigerator for 24 hours.
    • The next day, preheat oven to 275 degrees and sprinkle with salt, pepper and Worcestershire sauce. Cover and bake 5 hours or until a digital probe thermometer reads 190 degrees. After about 4 hours, I gently left the foil and using a meat thermometer, inserted into the thickest piece of the meat, read the internanal temperature. Then base my finishing time on that reading.
    • Drain the grease and remove the brisket to a cutting board. Let this brisket rest, tented with the foil for 10 minutes. Slice brisket against the grain and coat with BBQ sauce. Return to the roasting pan, cover with the foil and let the brisket cook, warming the bbq sauce. About 15 minutes.

    Notes

    Expert Tip: Larry, over at Big Dude’s, a brisket expert, adds this about oven baked brisket. “Every piece of brisket is different and cooks differently so it’s hard to use a single cooking time and temperature for all of them.  It is also a piece of meat with a very small window of just right and it goes from tough (under cooked) to dry (over cooked) very quickly.  Nearly all pro-brisket cooks monitor the internal temp until it gets to about 195* then use the prob test – when a probe slides in and meets little resistance (like room temperature butter) its done.”  
    Very important! Meat cuts like brisket, flank steak, skirt steak or even flap steak have muscle fibers that run in one direction. It’s crucial to cut this type of meat against the grain, meaning across the grain. This will shorten the fibers making it tender to chew. If you don’t follow this rule, you’ll have pieces of meat that are simply impossible to break down with your teeth.
    Don’t be tempted to raise the temperature to rush the cooking time. Your oven brisket will turn out tough. Slow oven roasting allows the fats to break down slowly, tenderizing the meat during this process.
    Before seasoning and cooking, find the grain and slice a small corner off the brisket. This will help you find the direction of the grain after it’s cooked = easier slicing decisions.

    Nutrition

    Calories: 526kcal | Carbohydrates: 10g | Protein: 65g | Fat: 23g | Saturated Fat: 8g | Cholesterol: 193mg | Sodium: 939mg | Potassium: 1114mg | Fiber: 1g | Sugar: 7g | Vitamin A: 48IU | Vitamin C: 1mg | Calcium: 28mg | Iron: 6mg

    If you liked this recipe, please leave a star ⭐⭐⭐⭐⭐ rating in the recipe card below and leave a comment. I always appreciate your feedback and hearing how everything went.

    And, don’t forget to subscribe to my newsletter for more delicious recipes and cooking tips. Make it a delicious day … every day.

    Oven Brisket …It’s what’s for Dinner.

    Colorado Travel: Fall Trip to Estes Park and Rocky Mountain National Park

    September 14, 2015 By Lea Ann Brown Leave a Comment

    elk rubbing neck on trees in Rocky Mountain National Park, Colorado Travel

    Fall is an absolutely spectacular time to visit our Northern Colorado Mountains. Elk Watching is the main attraction. Join us for our latest adventure: Colorado Travel: Fall Trip to Estes Park and Rocky Mountain National Park.

    The cowboy sign in Estes Park Colorado

    Let’s take a little trip to the hills.

    A week ago made our annual Fall trek to Estes Park. In between hiking, picnicking and sightseeing, I usually take about a hundred photos of elk. At this time of year, the elk migrate from high elevations to the meadows of our Rocky Mountains. The males with their harems gather and the rutting rituals begin.

    Elk in Estes Park, Colorado Travel Fall in Rocky Mountain National Park

    Elk Behavior In The Fall

    This year for about 15 minutes, I watched a male slowly and strategically sharpen his antlers…just in case a stray bachelor elk challenged his status with the herd of females.

    Elk in Estes park, Colorado Travel, Fall trip to Estes Park and Rocky Mountain National Park

    Upon closer observation, he slowly angled the antlers across the trunk of the tree, moving back and forth making sure to sharpen even the smallest point.

    Elk Watching Colorado Travel Estes Park Rocky Mountain National Park

    In between sharpening his antlers, he’d rub his neck on the trunk to leave his scent. Protecting his territory is serious business.

    Yorkshire terrier on picnic Colorado Travel Estes Park Rocky Mountain National Park

    Taking Dogs to Rocky Mountain National Park:

    Picnics are always on the agenda. This is a photo of Remy settling in nicely in his new adventure. This is our favorite spot to picnic in Rocky Mountain National Park. Endovalley picnic area at the base of old Fall River Road. And a picnic is easy with our favorite Prosciutto Parmesan Arugula Sandwich.

    A place to walk your dogs in Rocky Mountain National Park Colorado Travel

    Traveling with dogs to Rocky Mountain National Park can be a challenge. For very good reasons, the hiking trails in Rocky Mountain National Park do not allow dogs. It can be a tedious search to find a place to take your dog on a good long walk. And what a better place to find dog friendly trails near Estes Park. One of our favorites is off Bear Creek Road. Just past the Moraine Park Museum you’ll find a pullout on the right. This is a popular spot for fly fishing. Find a spot in the parking lot and then cross the bridge over the river. Dogs are allowed on areas accessed by vehicles. This road leads to private cabins and through a wide open space valley with fabulous views. Even though that open space might tempt you to let your dog run — keep them leashed. And park rules clearly state on a leash no longer than 6 feet. There are lots of opportunistic Coyote packs lurking in this area, Mountain Lions and elk are very common in this grassy valley. Be watchful.

    From their website:

    Although not allowed on trails, pets are still permitted in Rocky Mountain National Park. According to the park website, pets:

    “are allowed only in areas accessed by vehicles, including roadsides, parking areas, picnic areas and campgrounds. They must be kept on a leash no longer than six feet and attended at all times. Pet etiquette dictates always cleaning up after your pet and disposing of waste in trash receptacles.”

    Bear Lake Rocky Mountain National Park

    A side trip to Bear Lake is one of the high points of the Estes Park side of Rocky Mountain National Park. Very picturesque. It’s an easy hike around the lake, less than a mile. However since they don’t allow dogs on the trail, While Bob walked the dogs around the parking lot, I stayed at the trailhead and did a little bird watching and took advantage of the photo opportunities.

    We’ve always stayed at dog friendly Sunnyside Knoll Resort in Estes Park. Rocky Mountain National Park Hotels pretty much don’t exist. But this cabin complex is conveniently located between Estes and Rocky Mountain National Park. It’s right off Fall River Road, but in Cabin 18, you won’t hear any traffic noise at all. And so close to the park.

    Annual Trips have Annual Traditions. For our Fall trip to Estes Park, we always take a pot of my Pork Posole. A Southwestern pork stew that is a perfect Fall meal. Just click on the title to see the recipe.

    Simple Pork Posole

    Easy Pork Posole Recipe

    Butternut Squash and Apple Soup, No Dairy Recipe

    September 9, 2015 By Lea Ann Brown 36 Comments

    Butternut squash and apple soup garnished with sliced apples and chives

    This velvety butternut squash and apple soup is super easy, crazy delicious very healthy. It’s savory, sweet and absolutely divine. Adding apple and apple juice makes this a delightful dinner entree.

    Butternut squash and apple soup garnished with sliced apples and chives

    Fall is in the air and this butternut squash and apple soup couldn’t be more perfect for crisp weather.

    This soup is amazing due to the fact that there isn’t any heavy cream involved. The liquid is chicken broth and apple juice. And with plenty of savory butternut squash, we really enjoyed this incredibly colorful bowl of soup.

    It’s an easy soup to make, even for a weeknight meal. That “it’s Tuesday and I’m tired” type of recipe, and it’s elegant enough for entertaining or even for a special dinner.

    Using an immersion blender to puree butternut squash soup

    The only special equipment needed for this recipe is an immersion blender. Using this handy tool makes pureeing this soup a breeze. If you don’t have one, you can use a blender. Just put the hot soup in a blender in batches, only filling the blender half full each time. Puree in batches.

    Be careful with the lid, hold it loosely in place, as if you seal it, the heat might blow it off.

    All you need for a side dish is a sliced baguette, or a simple tossed salad.

    Non Dairy Butternut Squash Soup with Apple

    Butternut Squash Soup With Apple

    Butternut Squash and Apple Soup garnished with sliced apples and chives

    I hope you give this butternut squash apple soup recipe a try and if you do, please come back and give the recipe a star rating and scroll down and leave a comment about your experience with the recipe.

    And if you have a favorite butternut squash soup recipe, let me know, I’d love to give it a try.

    More Fall Soup Recipe Ideas

    • Chipotle Apple Sweet Potato Soup
    • Curried Butternut Squash Soup
    • Slow Cooker Beef Stew with Mushrooms
    • Easy Creamy Chicken Tortilla Soup

    And if you love soup as much as we do, don’t miss my soup category, you’ll find lots of great recipes, including the most popular soup on my site for Anthony Bourdain’s New Mexico Style Chili.

    If you liked this recipe, please leave a star ⭐⭐⭐⭐⭐ rating in the recipe card below and leave a comment. I always appreciate your feedback and hearing how everything went.

    And, don’t forget to subscribe to my newsletter for more delicious recipes and cooking tips. Make it a delicious day … every day.

    Butternut squash and apple soup garnished with sliced apples and chives
    Print Recipe
    5 from 1 vote

    Butternut Squash Soup With Apple

    This velvety butternut squash and apple soup is super easy, crazy delicious very healthy. It's savory, sweet and absolutely divine. Adding apple and apple juice makes this a delightful dinner entree.
    Prep Time40 minutes mins
    Cook Time45 minutes mins
    Total Time1 hour hr 25 minutes mins
    Course: Soup, Stews and Chilis
    Cuisine: American
    Servings: 8
    Calories: 116kcal
    Author: Lea Ann Brown

    Ingredients

    • 2 Tablespoons Butter
    • 1 Large onion finely diced
    • 36 ounces Butternut Squash one inch cubes
    • 6 Cups Chicken broth
    • 1 Large apple peeled, cored and diced
    • ½ Cup Apple juice
    • Salt and pepper

    Instructions

    • Melt the butter in a large stock pot and then add the onions. Saute the onions until they are soft and translucent. About five minutes.
    • Add the broth, butternut squash, apple and apple juice. Season with salt and pepper to taste. Bring to a boil, then turn to low and simmer for about 30 to 45 minutes, until the squash and apples are completely soft. Use an emulsion blender or puree in batches in a blender until all of the soup is silky smooth. Taste and season with salt and pepper.
    • Use an emulsion blender or puree in batches in a blender until all of the soup is silky smooth. Taste and season with salt and pepper.

    Nutrition

    Calories: 116kcal | Carbohydrates: 22g | Protein: 2g | Fat: 3g | Saturated Fat: 2g | Cholesterol: 8mg | Sodium: 677mg | Potassium: 650mg | Fiber: 3g | Sugar: 7g | Vitamin A: 13661IU | Vitamin C: 41mg | Calcium: 76mg | Iron: 1mg

    Butternut Squash Soup with Apple … It’s what’s for Dinner.

    Spaghetti Pasta Nests with Tomato Basil Sauce

    September 4, 2015 By Lea Ann Brown 12 Comments

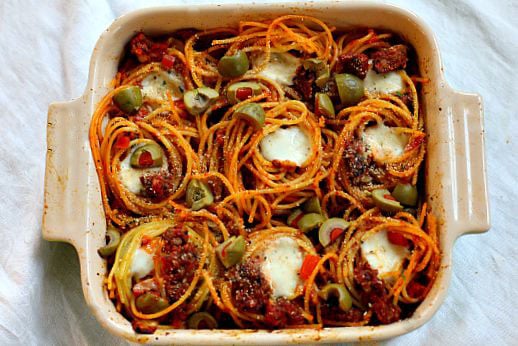
    This is a recipe for Pasta Nests. Spaghetti noodles are cooked then coated with egg. Using your favorite casserole dish, form the spaghetti into circles and tip with fresh Mozarella cheese and Napa Valley Tomato and Sweet Basil Sauce.

    Spaghetti nests ready to serve

    Spaghetti Nests with Mezzetta pasta sauce. This post has been sponsored by Mezzetta Brand. I have received compensation, however, all opinions are my own.

    Thanks once again to my favorite food in a jar, Mezzetta. For as long as I can remember, I’ve always reached for their jars of olives and pickles, but did you know they also make pasta sauces?

    Spaghetti is one of my favorite and easy weeknight meal thanks to that aisle of jarred sauces. My little secret is to buy the sauce and then doctor it up with a good Italian sausage and a sprinkle of fennel seed. That’s it…and everyone raves.

    However, I don’t make that easy version often because of the ingredients listed on the labels on those jars…lots of sodium, high fructose corn syrup and some you can’t pronounce.

    Mezzetta states on the front of their label “all natural” and they mean it.

    I can now feel safe about serving this jarred sauce to my family. Real food. Take a look at the ingredients listed: No added sugar, California plum tomatoes, imported olive oil, fresh onions and roasted garlic, fresh basil, sea salt and spices. 

    Spaghetti bake with fresh mozzarella

    How To Make Pasta Nests

    For this project, I decided to put a twist on my easy stove top spaghetti and make baked pasta nests.

    I used spaghetti noodles, but you can also use fettuccini or angel hair pasta.

    Here are my little swirls of goodness ready for the oven.

    • Cook the pasta very al la dente.
    • In a large bowl, mix one egg and the pasta sauce and then pour in the spaghetti and toss well to coat.
    • Using a spoon and fork, twirl the spaghetti into little nests and placed them in the baking pan.
    • Pushed little balls of fresh mozzarella into the center of each nest.
    • Sprinkle with Italian bread crumbs and some green olives for zing.
    • Bake 350 degrees for 30 minutes
    A different way to prepare spaghetti

    Out of the oven and ready to dig in for a perfect pasta night dinner.

    Spaghetti dinner with salad

    One little pasta nest with a beautifully prepared fresh salad and I felt indulgent but guilt free.

    Recipe for Pasta Nests

    I hope you give this Spaghetti Nests Recipe a try. And if you do, please come back and let me know how you liked it and give the recipe a star rating.

    Your feedback is valuable to me for developing future recipes. And if you have a favorite spaghetti recipe using Mezzetta sauces, let me know, I'd love to give it a try.

    Related Recipes

    • Ricotta Pasta Sauce with Italian Sausage, cherry tomatoes over pappardelle pasta
      Italian Sausage Ricotta Pasta Sauce
    • Chicken bolognese served on a pasta plate topped with parmesan cheese.
      Quicker Chicken Spaghetti Bolognese
    • Slow Roasted Cherry Tomatoes Pasta Sauce With Cream
    • Bucatini pasta tossed with rustic marinara sauce and braised short ribs. Topped with Parmesan cheese and capers
      Pasta with Short Ribs, Capers and Rustic Marinara Sauce

    And if you’re looking for more pasta recipes, don’t miss my pasta category. You’ll find lots of comfort food recipes, including the most popular on my site for Fettuccine Mio Amore.

    If you liked this recipe, please leave a star ⭐⭐⭐⭐⭐ rating in the recipe card below and leave a comment. I always appreciate your feedback and hearing how everything went.

    And, don’t forget to subscribe to my newsletter for more delicious recipes and cooking tips. Make it a delicious day … every day.

    A different way to prepare spaghetti
    Print Recipe
    5 from 2 votes

    Spaghetti Pasta Nests

    A twist on spaghetti, these little pasta nests are an easy and fun weeknight dinner.
    Prep Time30 minutes mins
    Cook Time30 minutes mins
    Total Time1 hour hr
    Course: Pasta Recipes
    Cuisine: Italian
    Servings: 8
    Calories: 604kcal
    Author: Lea Ann Brown

    Ingredients

    • 1 pound spaghetti
    • 1 egg
    • 1 25-ounce jar Mezzetta Tomato and Sweet Basil Tomato Sauce
    • 1 pound Italian Sausage
    • 1 tablespoon fennel seed dried
    • 16 ounces mini fresh mozzarella balls you'll need 10 little mozzarella balls
    • 2 tablespoons Italian bread crumbs
    • 10 green olives sliced in half

    Instructions

    • Preheat oven to 350 degrees. In a large sauce pan cook the spaghetti according to package directions, minus two minutes, so it’s very al la dente.
    • In the meantime, in a large fry pan over medium heat, fry the Italian Sausage until cooked through. Drain off any grease and then stir in the entire jar of the Mezzetta pasta sauce and the fennel seed. Cook until just reheated.
    • In a large mixing bowl, add one egg, beaten. Drain the spaghetti and add to the bowl with the egg and mix well. Add the sauce and stir gently.
    • Using a large serving spoon and a fork, twirl the spaghetti into nests and place in a 9 x 13″ baking pan sprayed with non-stick spray.
    • When all the nests are in place, push one of the mini mozzarella balls into the enter of each. Sprinkle with Italian bread crumbs and sliced green olives.
    • Bake until nice and steamy. 30 minutes.

    Nutrition

    Calories: 604kcal | Carbohydrates: 46g | Protein: 29g | Fat: 33g | Saturated Fat: 14g | Cholesterol: 108mg | Sodium: 894mg | Potassium: 339mg | Fiber: 2g | Sugar: 2g | Vitamin A: 433IU | Vitamin C: 1mg | Calcium: 328mg | Iron: 2mg

    Spaghetti Pasta Nests …They’re whats for Dinner.

    Prosciutto Parmesan Ciabatta Bread Sandwich

    August 12, 2015 By Lea Ann Brown 37 Comments

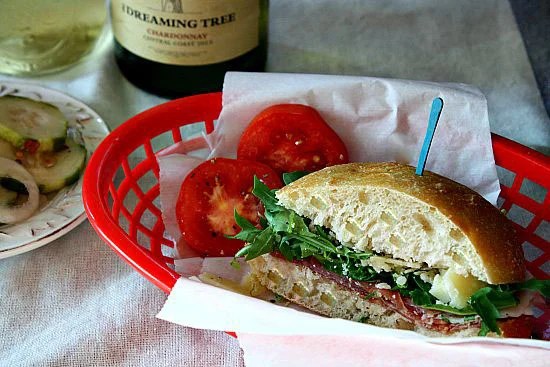
    Picnic Sandwich

    This Prosciutto Parmesan Arugula Ciabatta Bread Sandwich is the perfect sandwich for a picnic. So perfect it was the picnic sandwich featured in the Movie Sideways.

    Picnic Sandwich

    Happy Summer everyone. The skies are blue and the sun is hot and the ‘livin is easy…well not really. Around this time every year, we’re starting to hear the phrases like “back to school” and “where has the Summer gone” and we start feeling the crunch to invite everyone over that we’ve not invited over yet.

    There’s still Summer entertaining to complete before those evenings turn to crisp, cool sweater weather. But it’s hot and turning on the oven or standing out in the sun over a hot grill doesn’t sound all that much fun. Enter no-cook Summer entertaining without a flame or a pot of boiling water in sight.

    How about a Summer picnic sandwich from one of my favorite all time favorite movies, Sideways.

    Wine Country, adventure, drama, romance and disfunction…this movie is one we’ve watched ten times since it’s release. Hubs and I even took a trip to the Santa Barbara/Solvang area and traced the paths of wineries and restaurants that were featured in the movie.

    picnic with wine

    Prosciutto, Parmesan Arugula Ciabatta Bread Sandwich is from a scene in the movie where the characters take a break from the drama and enjoy an idyllic picnic with bottle of wine on a blanket enjoying conversation, wine and food smack dab in the middle of California wine country and I knew my search for a no-cook recipe was over.

    My good friends in Denver have just introduced us to this Dave Matthews wine. We’ve really enjoyed every bottle we’ve had. A lack of minerality in the flavor of this Chardonnay just happened to be a perfect pairing for this sandwich. Thank you Heather!

    Chewy ciabatta bread sandwich with salty prosciutto and peppery arugula come together for a great sandwich with a generous drizzle of truffle oil.

    I splurged on a tiny little bottle of black truffle oil and I’m so glad I did. Even with all of those wonderful ingredients, I really felt it stole the show.

    This sandwich is so good it rivals everyone’s favorite, the BLT.

    Great picnic sandwich for a bottle of chardonnay
    Sideways Movie Picnic Sandwich. With Prosciutto Arugula and Parmesan. Great picnic sandwich recipe.
    Print Recipe
    5 from 3 votes

    Prosciutto, Parmesan, Ciabatta Bread Sandwich

    A great sandwich to enjoy with a crisp Chardonnay. The perfect picnic sandwich
    Prep Time15 minutes mins
    Total Time15 minutes mins
    Course: Main Course Sandwiches
    Cuisine: American
    Servings: 2
    Calories: 303kcal
    Author: Lea Ann Brown

    Ingredients

    • 2 Ciabatta Rolls
    • 2 ounces Prosciutto thinly sliced
    • 1 ounce Parmesan cheese thinly sliced
    • 2 baby arugula small handful
    • truffle oil to taste
    • freshly ground black pepper to taste

    Instructions

    • Slice the fresh ciabattini (ciabatta rolls) in half. Divide the prosciutto between the two bottoms of the rolls. Do the same with the Parmesan. Divide the baby arugula between the two buns and drizzle with a little truffle oil. Grind some black pepper over the top. Set the top half of the roll on top of everything.

    Nutrition

    Calories: 303kcal | Carbohydrates: 27g | Protein: 13g | Fat: 15g | Saturated Fat: 6g | Cholesterol: 28mg | Sodium: 690mg | Potassium: 56mg | Fiber: 1g | Sugar: 1g | Vitamin A: 158IU | Calcium: 168mg | Iron: 1mg

    Prosciutto Parmesan Arugula Ciabatta Bread Sandwich…It’s what’s for a Summer Dinner.

    « Previous Page
    Next Page »

    I'm Lea Ann

    Welcome to my Colorado kitchen. If you're a fan of rustic homestyle cuisine, you've come to the right place. I'm a Culinary School Grad with a passion to inspire you to cook as often as you can. I offer reliable, approachable and easy to follow recipes. So grab that skillet and let's cook.

    More about me
    Graphic for Hatch Chile Recipes

    Reader Favorites

    • Super Moist Cheesy Cornbread with Creamed Corn
    • Flemings steakhouse macaroni and cheese in a white bowl.
      Flemings Steakhouse Mac and Cheese
    • Layered Mexican Casserole in a 9 x 13 pyrex dish with ground beef and corn tortillas, garnished with tomatoes and cilantro
      Mexican Casserole with Ground Beef and Corn Tortillas
    • Beef Tagliata, thin sliced flank steak served over arugula and cherry tomatoes.
      Beef Tagliata (Italian Steak)
    • Fried corn tortilla quesadilla topped with a fried egg.
      Crispy Ham and Cheese Corn Tortilla Quesadillas
    • Spinach chicken mushroom skillet dinner.
      Chicken Mushroom and Spinach Skillet

    Popular Spring Pasta Recipes

    • Pappardelle pasta with ham and peas in a lemon cream sauce.
      Pasta with Ham and Peas In A Parmesan Lemon Cream Sauce
    • Chicken macaroni salad on a white plate.
      Creamy Tangy Chicken Macaroni Salad Recipe
    • Angel hair pasta with asparagus and lemon in a large fry pan.
      Angel Hair Pasta And Asparagus With Lemon Cream Sauce
    • A bowl of shrimp scallop pasta with orange cream sauce.
      Shrimp Scallop Pasta With Orange Cream Sauce

    Footer

    • Contact
    • About
    • Privacy Policy
    • Accessibility Statement
    • ↑ back to top

    Copyright © 2024 Cooking on the Ranch • Powered by Feast+

    Rate This Recipe

    Your vote:


    A rating is required
    A name is required
    An email is required