Roasted Cherry Tomatoes Pasta Sauce with Cream is totally incredible. Slow roasting cherry tomatoes bring a unique caramelized flavor to this pasta recipe. Creamy, sweet and savory, this easy pasta dinner is addicting in flavor.

You haven’t lived until you’ve slow roasted petite tomatoes. Prepare to have your mind blown away.
Claiming to be a tomato purist, I wait all year for tomato season. Snubbing the hot house varieties all season long.
And then celebrate the first home grown fruit by making the world’s greatest sandwich, the BLT.
Then we eat fresh tomatoes on everything, eggs and anything cooked and raw we can think of.
Cooking With Winter Cherry Tomatoes
But there’s a cure for those winter tomato blues.
Let’s talk about those fun packages of small cherry and grape tomatoes that brighten our winter produce departments. They make a beautiful cherry tomato pasta sauce.
They’re colorful and they pop with flavor. Not only are they scrumptious to snack on, but they’re in every salad I prepare because they’re easy to cut in half. Just grab your sharpest serrated knife.
I make a lot of Mexican food, and when chopped, these colorful little cherry tomatoes make a beautiful garnish for any Mexican Casserole, Taco, like this recipe for Slow Cooker Tinga Chicken, or Enchilada you put on the table. I love them.
Slow Roasting Cherry Tomatoes
When roasted at a low temperature, you’d swear someone snuck into your oven and sprinkled them with magic.


To make this pasta with tomatoes recipe:
- With a serrated knife, halve the cherry tomaatoes.
- Place them cut side up on a sheet pan.
- Sprinkle them with sea salt and a little sugar if you’d like and bake for 90 minutes in a 275 degree oven.
And they transform into a culinary treat. Choose petite tomatoes that are firm and colorful. The firmer the tomato, the better results you’ll have with roasting.
Chef Tip: I like to purchase Cherub brand tomatoes. Cherubs are a variety of grape tomatoes which have a stronger outer skin and meatier, less watery flesh. They are easier to slice for salads, hold up better during cooking or roasting and are reliable year round with their mild, sweet flavor.
Sweet and caramelized, you’ll be tempted to eat them all up before they make it into this recipe.
Once you’ve slow-roasted these tiny beauties, there are so many ways to use them.
- Layer them over meat.
- Use them in salsas.
- But make sure you add them to this creamy pasta sauce.

Choose your favorite fun-shaped pasta and serve on your next pasta night. Heaven!
I always have good luck finding unique pasta shapes at HomeGoods. For this recipe I used Garganelli pasta. Garganelli pasta is an egg based pasta from the Romagna area of Italy.

Roasted Cherry Tomatoes Pasta Sauce with Cream
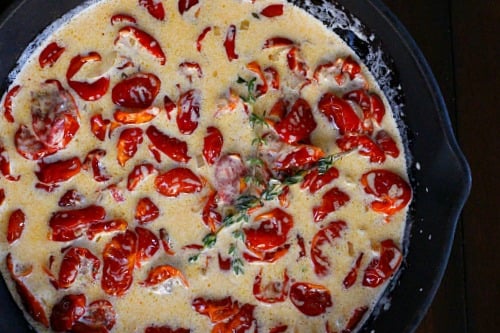
There’s so much beauty in this recipe. The cream doesn’t over power the dish and the thyme and basil bring everything together.
Don’t forget the grated Parmesan to finish. It’s all so delightful.
I hope you give this recipe for pasta with slow roasted cherry tomatoes a try and if you do, please come back and give the recipe a star rating. And if you have a favorite pasta with cherry tomatoes recipe, let me know, I’d love to give it a try.
Explore More Comfort Food Main Course Pasta Recipes


And don’t miss my Pasta Category. You’ll find the most popular pasta recipe on my site for Spicy Creamy Shrimp Pasta.
If you liked this recipe, please leave a star ⭐⭐⭐⭐⭐ rating in the recipe card below and leave a comment. I always appreciate your feedback and hearing how everything went.
And, don’t forget to subscribe to my newsletter for more delicious recipes and cooking tips. Make it a delicious day … every day.

Slow Roasted Cherry Tomatoes Pasta Sauce with Cream
Ingredients
- 1½ pounds cherry tomatoes halved
- 2 tablespoons extra-virgin olive oil
- Fine sea salt
- Freshly ground black pepper
- 2 tablespoons unsalted butter
- 1 shallot
- 2-3 fresh thyme sprigs
- 1 cup heavy cream
- 1 tablespoon fresh basil coarsely chopped
- 1 pound pasta unique shaped
- 1 cup freshly grated Parmigiano-Reggiano cheese divided
Instructions
- Preheat oven to 275 degrees.
- Arrange cherry tomatoes cut-side up on a large rimmed baking sheet. Drizzle olive oil over tomatoes and sprinkle with ½ teaspoon salt and a grinding of pepper. Roast tomatoes until they are somewhat puckered and shriveled, but still juicy, about 90 minutes.
- Bring a large pot of water to a boil over high heat and salt generously.
- In a large, deep sauté pan over medium-low heat, melt butter. When butter has just begun to foam, stir in shallot. Cook, stirring frequently, until shallot is softened but not browned, about 7 minutes.
- Scrape in tomatoes and any juices that have collected on the baking sheet. Add thyme sprigs and pour in cream. Heat gently to a simmer over low to medium-low heat. Right before dressing the pasta, turn off heat and stir in basil.
- Meanwhile, add pasta to boiling water and cook according to package instructions until al dente.
- Drain pasta in a colander, reserving about 1 cup of pasta water. Return pasta to pot and stir in the cream tomato sauce. Add ½ cup of Parmigiano-Reggiano cheese. Toss gently to combine. Add ½ cup of reserved pasta water, if necessary, to loosen sauce and toss again.
Notes
Nutrition
Roasted Cherry Tomatoes Pasta … It’s what’s for Dinner.