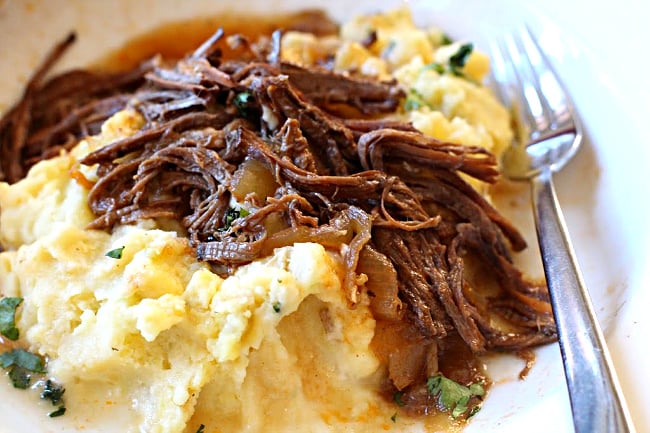
Cooking On The Ranch

  • Home
  • About
  • Recipe Roundup
  • Contact Me
  • Join Community
menu icon
go to homepage
  • Home
  • Soups, Stews, & Chilis
  • About
  • Recipe Roundup
  • Contact Me
    • Facebook
    • Instagram
    • Pinterest
  • search icon
    Homepage link
    • Home
    • Soups, Stews, & Chilis
    • About
    • Recipe Roundup
    • Contact Me
    • Facebook
    • Instagram
    • Pinterest
  • ×
    Home

    Weeknight Rotisserie Chicken Tacos

    March 25, 2022 By Lea Ann Brown 16 Comments

    Rick Bayless rotisserie chicken tacos on homemade tortillas.

    On the table in under 30 minutes! Taco night just got easier with this recipe for Rotisserie Chicken Tacos. Calling all busy home cooks and parents who need a quick chicken taco recipe. This recipe is a dream meal for those hectic weeknights. Not your plain old chicken taco, you won’t believe the blast of flavor.

    Another one of our favorite ways to use leftover rotisserie chicken is for this Leftover Rotisserie Chicken Soup. I urge you to take a look at that quick meal recipe also.

    Rotisserie chicken tacos with potatoes, avocado and romaine.

    Aren’t tacos amazing? While eating Taco Bell as a teenager, little did I know that a few hundred miles directly south, people were churning out authentic Mexican homemade taco shells, filled with fresh meat, exotic spices and rolling them up into pure bliss. And had been doing so for centuries. Tacos are so versatile, so easy and you can turn just about anything into a taco filling.

    Why These Rotisserie Chicken Tacos Make Taco Tuesday Easy

    These Rotisserie Chicken Tacos aren’t your regular taco seasoned meat tacos. Unique with flavor and quick to the table, you’ve got chicken tacos that you’ll think about long after the meal is done. Let’s take a look:

    • These are chicken tacos with potatoes. You’ll learn a super quick method to cook potatoes in the microwave in just 4 minutes!
    • The chicken and the potatoes are drizzled with a tingling chipotle vinaigrette.
    • There’s so much flavor, we’ll keep the toppings simple with sliced avocado and sliced jalapeno pepper.
    • This is a Rick Bayless recipe, which he calls Chicken Salad Tacos. Rick specializes in authentic Mexican food, but has no issues taking modern liberties with his creations. This is a great example of thinking outside the taco shell box.

    When you need dinner fast, these rotisserie chicken tacos are the ticket. A recipe that is so very easy and so packed with flavor.

    Table of contents

    • Why These Rotisserie Chicken Tacos Make Taco Tuesday Easy
    • Ingredients You’ll Need
    • Ingredient Substitutions
    • Quick & Flavorful Rotisserie Chicken Taco Filling
    • Tips For The Fastest Taco Night Ever
    • Variations, Favorite Taco Toppings
      • Equipment Needed
    • Storage
    • Best Sides With Chicken Tacos
    • Rotisserie Chicken Tacos FAQ’s
    • Pro Tip – Warming Tortilla Shells
    • Recipe For Rotisserie Chicken Tacos
      • Related Recipes

    Ingredients You’ll Need

    Ingredients to make rotisserie chicken tacos.
    • Romaine Lettuce: Flavoring lettuce makes these somewhat of a chicken salad tacos.
    • Corn Tortillas: Note: I have made my own corn tortillas using blue and red masa. Purchase soft corn tortillas from the Mexican food aisle at the store. Either yellow or white corn tortillas will work.
    • Potatoes
    • Rotisserie Chicken
    • Chipotle Peppers in Adobo
    • Avocado
    • Onions
    • Apple Cider Vinegar
    • Mexican Oregano: Mexican oregano has lemon and citrus flavors which always pair well with spicy Mexican recipes.
    • Olive Oil

    Ingredient Substitutions

    • Lettuce: Romaine lettuce is a very crispy lettuce. Avoid substituting softer lettuces such as red leaf, rather choose Iceberg Lettuce for that crispy texture.
    • Potatoes: I like those small red skinned potatoes for this recipe because you don’t have to peel them. A very good substitute would be small Yukon Gold Potatoes. Creamy in texture and no peeling required.
    • Chicken: The beauty of these tacos is that using a rotisserie chicken makes this an easy fix. You can also cook and shred either boneless skinless chicken thighs or chicken breasts.
    • Oregano: If you can’t find Mexican oregano, please don’t substitute the more commonly found Mediterranean oregano. The flavor profiles are not similar. A better substitute is Marjoram. Known for its aroma and delicate flavor, its related to oregano and will bring a sweet undertone to any recipe.

    Quick & Flavorful Rotisserie Chicken Taco Filling

    Making rotisserie chicken tacos are a breeze. Let’s get started.

    Sliced potatoes in a bowl covered with plastic wrap and ready to cook in the microwave.
    Using a fork to chop up potatoes
    1. Step 1: Prepare the potatoes. Slice the potatoes and place in a microwave safe bowl. Drizzle them with ¼ cup water, or better yet, chicken broth. Add about a teaspoon of kosher salt, cover with plastic wrap and using a fork, poke a few holes in the top of the plastic wrap. Microwave on high for 4 minutes. Reserve potato water.
    2. Step 2: Using a fork, rough chop the potatoes. Set aside.
    Making spicy vinaigrette for rotisserie chicken tacos.
    Chipotle Vinaigrette for rotisserie chicken tacos.
    1. Step 3: Make the vinaigrette seasoning. Add vinegar, oregano, chipotle chiles, adobo sauce, and onion to the bowl with the potato cooking water to make a dressing.
    2. Step 4: Using a whisk, mix well. Season with salt and pepper and set aside.
    Mixing ingredients together to make rotisserie chicken tacos.
    Adding romaine lettuce to ingredients to make chicken salad tacos.
    1. Step 5: Scoop the potatoes into a large bowl. Add the shredded rotisserie chicken and drizzle on the dressing and toss everything together. Refrigerate the mixture for 15 minutes to blend flavors.
    2. Step 6: Just before serving, add the lettuce and avocado to the bowl. Drizzle with the oil and toss to combine. 

    TIP: Serve with warmed corn tortillas and enjoy. Serve with a wedge of lime. A squeeze of lime juice will brighten flavors even more.

    Tips For The Fastest Taco Night Ever

    • Pre-shred the rotisserie chicken in the morning before you go to work. Just seal and keep in the refrigerator until ready to use.
    • You can also slice the potatoes in advance and keep them submerged in the water until ready to use.
    • Use store purchased formed crispy taco shells rather than soft corn tortillas.
    • Instead of using lettuce, purchase a package of pre-sliced cole slaw mix.

    Variations, Favorite Taco Toppings

    From crunchy and fresh to creamy and cool, here are some great ideas for additional toppings.

    • Instead of sliced avocado, once the tacos are assembled, add a dollop of Molcajete Guacamole on top.
    • Radishes are a common topping for Mexican tacos. Add some thin slices on top.
    • Trying to save on carbs? Use cooked small cauliflower florets instead.
    • Sprinkle on some Mexican crumbling cheese such as Cotija cheese. Feta cheese is a good substitution if you don’t have Cotija.
    • Want to make this a vegetarian taco? Substitute white beans for the chicken.
    • Use street taco size flour tortillas.
    • I personally don’t think a taco should be served without slices of fresh jalapeno pepper and chopped cilantro. And always squeezed lime juice.
    • A dollop of sour cream or Mexican Crema would be nice here.

    Equipment Needed

    • Microwave Safe Bowls: I don’t know how I ever lived without my nesting microwave safe bowls. They’re easy to store because they stack inside each other. And there are nine sizes, convenient for about anything you’re cooking up.

    Storage

    Unfortunately once these tacos are mixed together, storing leftovers won’t work. The vinegar in the dressing will wilt the lettuce once it sits for awhile.

    Best Sides With Chicken Tacos

    Since this is a quick weeknight dinner, you want to keep the sides easy and simple. Take a look at this quick and easy Stove Top White Cheddar Mac and Cheese. Or start these Slow Cooker Cowboy Beans earlier in the day to be ready for dinner.

    For a more traditional side dish, take a look at my recipe for Toasted Green Rice.

    Rotisserie Chicken Tacos FAQ’s

    How Much Shredded Chicken Will One Rotisserie Chicken Yield?

    About 3 – 4 cups of meat, enough for 8 – 12 tacos. Because we’re adding potatoes to these tacos, we’ll only need a portion of rotisserie chicken. Perfect for using up some of that left over rotisserie chicken. Tip: Instead of trying to smush chicken into a measuring cup, use a kitchen scale to weigh the chicken. And by all means it doesn’t have to be exact. I don’t think I’ve ever measured the chicken for this recipe. I’ve always just assembled a small little pile of shredded chicken.

    How do you shred rotisserie chicken meat?

    Using a fork, pry a big piece of chicken from the bones. Using two forks, or clean hands, simply pull apart the meat into small shredded pieces. Or you can use an electric mixer. Place the deboned chicken in a bowl and let your mixer do the work for you. Use a lower speed.

    How long does rotisserie chicken keep?

    Rotisserie chicken will keep in the refrigerator 4 – 5 days after purchase. So make these tacos within that time period. And don’t throw away the carcass. Make chicken stock and freeze it for future use.

    Pro Tip – Warming Tortilla Shells

    You simply can’t take a corn tortilla out of it’s package and make a taco. You have to soften that tortilla so it’s flexible. Microwave: To warm tortillas, place them in a very damp clean dish towel. I just quickly one swipe the towel under low pressure water from the tap to add a little bit of moisture. You can also dampen a double thick paper towel, big enough to cover the tortillas. Wrap a stack of corn tortillas in the towel and place the package into a gallon zip lock bag. Don’t close the bag. Microwave for 4 minutes at 50% power. Stovetop: Simply place a tortilla directly on the grate of a gas stove top. Turn on the flame the same size as the tortilla. Let it cook for about 20 seconds then turn and repeat. Don’t walk away because they cook very quickly.

    Recipe For Rotisserie Chicken Tacos

    Chicken and potato tacos with avocado and limes.

    I hope you give these rotisserie chicken tacos a try. They may not be as rich and complex as Pulled Pork Tacos (carnitas) or Chorizo Tacos, they don't have the sweet-savory balance of Tacos al Pastor, but they've got one big advantage, they're really easy to make. And no matter how hard you try, very difficult to mess up.

    Chicken tacos with rotisserie chicken makes these chicken salad tacos a breeze to make. A great recipe to have in your back pocket for an easy weeknight meal.

    And if you’re taco crazy like us, don’t miss my taco category. You’ll find lots of great taco recipes, including the most popular on my site for Pork Tenderloin Tacos.

    Related Recipes

    • Fried tacos served with salsa and sour cream.
      Mexican Fried Tacos (Tacos Dorados)
    • Grilled fish tqacos with cod.
      Tequila-Lime Fish Tacos With Cod
    • How to make a tostada with chorizo, refried beans and toppings.
      How To Make A Mexican Tostada
    • Panko battered fish tacos with hoisin tarter sauce
      Crispy Panko Fish Tacos with Hoisin Tarter Sauce

    If you liked this recipe, please leave a star ⭐⭐⭐⭐⭐ rating in the recipe card below and leave a comment. I always appreciate your feedback and hearing how everything went.

    And, don’t forget to subscribe to my newsletter for more delicious recipes and cooking tips. Make it a delicious day … every day.

    Rick Bayless rotisserie chicken tacos on homemade tortillas.
    Print Recipe
    5 from 2 votes

    Weeknight Rotisserie Chicken Tacos With Potatoes (Ready in 30 Minutes)

    Rotisserie chicken tacos are a tingly tangy recipe that makes a great taco filling. Using Rotisserie chicken makes this an easy dinner fix.
    Prep Time10 minutes mins
    Cook Time5 minutes mins
    Resting time15 minutes mins
    Total Time30 minutes mins
    Course: Mexican
    Cuisine: Mexican
    Diet: Gluten Free
    Servings: 6 tacos
    Calories: 318kcal
    Author: Lea Ann Brown

    Ingredients

    • 8 ounces red skin or Yukon Gold potato sliced ¼ thick
    • ¼ cup water
    • 3 Tablespoons cider vinegar
    • 1 teaspoon dried oregano Mexican if you have it
    • 2 canned chipotle chiles en adobo seeded and chopped
    • 1 teaspoon adobo sauce from the can of chiles en adobo
    • ½ sweet onion fine chopped
    • ½ pound Rotisserie Chicken removed from bone, skin removed and shredded
    • 2 cups sliced romaine leaves
    • 1 avocado flesh scooped from skin and cut into ¼ cubes
    • 2 tablespoon olive oil
    • 12 soft corn tortillas warmed
    • Serve with lime wedges and sliced jalapeno

    Instructions

    • Place sliced potatoes into a large microwaveable bowl, drizzle with ¼ cup water and sprinkle generously with salt. Cover with plastic wrap, poke a couple of holes in the top and microwave on high for about 4 minutes, or until tender but not mushy. Scoop the potatoes onto a cutting board, leaving the liquid behind. Let the potatoes cool.
    • Use a fork to break the cooled potatoes into ½ inch pieces.
    • Make the Vinaigrette: Add vinegar, oregano, chipotle chiles, adobo sauce, and onion to the bowl with the potato cooking water to make a dressing. Mix well, then season with salt to taste.
    • Scoop the potatoes into a large bowl. Add the chicken and drizzle on the dressing and toss everything together. Refrigerate the mixture for 15 minutes to blend flavors.
    • Just before serving, add the lettuce and avocado to the bowl. Drizzle with the oil and toss to combine. Serve with warmed tortillas for soft tacos.

    Notes

    About Warm Tortillas: Once tortillas are warmed they can become very soft. Use two tortillas per taco. Just stack them together and scoop on the ingredients. This recipe will make 6 tacos. 
    How To warm corn tortillas. You simply can’t take a corn tortilla out of it’s package and make a taco. You have to soften that tortilla so it’s flexible. To warm tortillas, place them in a very damp clean dish towel. I just one-swipe the towel under low pressure water from the tap to dampen it. You can also use a doubled paper towel large enough to cover the tortillas. Wrap a stack of corn tortillas in the damp towel and place the package into a gallon zip lock bag. Don’t close the bag. Microwave for 4 minutes at 50% power. Let them set for a minute or two to steam before removing them from the package.
    Variations:
    • Instead of sliced avocado, once the tacos are assembled, add a dollop of guacamole on top.
    • Radishes are a common topping for Mexican tacos. Add some thin slices on top.
    • Trying to save on carbs? Use cooked small cauliflower florets instead.
    • Sprinkle on some Mexican crumbling cheese such as Cotija cheese. Feta cheese is a good substitution if you don’t have Cotija.
    • Want to make this a vegetarian taco? Substitute white beans for the chicken.
    • Use formed crisp taco shells rather than soft corn tortillas.
    • Use street taco size flour tortillas.
    • I personally don’t think a taco should be served without slices of fresh jalapeno pepper and chopped cilantro.

    Nutrition

    Calories: 318kcal | Carbohydrates: 37g | Protein: 14g | Fat: 14g | Saturated Fat: 2g | Polyunsaturated Fat: 2g | Monounsaturated Fat: 8g | Cholesterol: 28mg | Sodium: 135mg | Potassium: 586mg | Fiber: 8g | Sugar: 3g | Vitamin A: 1728IU | Vitamin C: 13mg | Calcium: 72mg | Iron: 2mg

    Rotisserie Chicken Tacos … It’s What’s For Dinner

    Pan Fried Boneless Chicken Thighs with Lemon Cream Sauce

    March 22, 2022 By Lea Ann Brown 31 Comments

    Pan fried chicken thighs served with lemon cream sauce and white beans.

    Pan fried boneless chicken thighs come to the rescue for an easy weeknight meal. Boneless, skinless thighs cooked stove-top turn crispy, tender and juicy and ready in about 30 minutes. Add an easy creamy lemon sauce for a special feel meal.

    And don’t miss this easy chicken dinner recipe for Spinach Chicken Mushroom Skillet. A meal in one pan.

    Pan fried chicken thighs on a dark blue plate served with beans and lemon cream sauce.

    Pan fried Boneless skinless chicken thighs are not only easy to cook, but an inexpensive dinner option. Fried stove top, they are easy to crisp and with that dark meat flavor, a very tasty option over chicken breasts.

    This one pot, easy clean up pan fried chicken thigh recipe is one to keep in your back pocket for those hectic weeknight dinner options.

    Pan fried boneless chicken thighs are easier to cook than breasts, tastier than breasts because they’re less likely to dry out. This one pot chicken dinner is simply mouthwatering and delicious.

    And did I mention they have lots of dark meat flavor? If you’re stuck in a chicken breast rut, it’s time to get on board with chicken thighs. I think they’re the best part of the bird.

    Ingredients to make pan fried chicken thighs.
    • Boneless skinless chicken thighs.
    • Chicken Broth.
    • Fresh Parsley.
    • Lemon.
    • Butter.
    • Flour.
    • Cream.
    • Garlic.
    • Red Pepper Flakes.

    How To Pan Fry Chicken Thighs

    Pounding boneless skinless chicken thighs with a meat mallet.
    Dusting boneless skinless chicken breasts with flour.
    1. Step 1: A quick pounding with a meat mallet will even out the chicken thighs for more uniform cooking.slight dusting with flour and the rest was tender flavorful history. 
    2. Step 2: Sprinkle the chicken thighs with all purpose flour. Shake off any access flour. Season with salt and pepper.
    Frying boneless skinless chicken thighs in a heavy skillet.
    1. Step 3: Heat a large heavy skillet over medium high heat. Add the oil until hot and then add chicken thighs. Cook on both sides until nicely browned. About 4-5 minutes per side. Remove thighs to a plate and cover with the lid or foil to keep warm.
    Making lemon sauce for boneless skinless chicken thighs.
    1. Step 4: In a bowl, combine chicken broth, garlic, red pepper flakes and lemon juice, Add to the hot pan, scraping pan to collect all of the browned chicken bits that have collected on the pan. Simmer for 8-10 minutes.
    Adding butter and flour to pan to make roux for lemon cream sauce.
    Adding fried boneless skinless chicken thighs to lemon cream sauce.
    1. Step 5: Remove pan from heat and stir in butter and cream.
    2. Step 6: When the butter has melted add the chicken back into the pot. Stir well to coat the chicken with the sauce. Serve immediately.

    Pro Tip; Hot pan, cold oil. The reason we heat the pan and then add the oil, is to quickly get the oil nice and hot before adding food. Once food hits that oil, you want to immediately hear it sizzle. If the oil isn’t hot enough to sizzle, the food will soak up the oil, which will compromise taste and texture. How to tell if the oil is hot enough? It should appear to “shimmer”. You should be able to see a finger like texture.

    Tips For Success

    • Don’t overcrowd the pan. Leaving some space and air between the chicken pieces will result in a crispier fried chicken thigh. If the pan is stuffed full of chicken, it will create steam which hampers the frying process.
    • Don’t make a big fuss over turning the chicken. With any meat, once the chicken has browned on one side, it will effortlessly release from the pan. That means it’s ready to turn and will be golden browned on one side.

    Substitutions

    • Gluten Free: Dust the chicken with an all purpose gluten free flour to make this a gluten free recipe.
    • Chicken Cutlets: Use chicken breast cutlets in place of chicken thighs.

    Equipment Needed

    • Good quality skillet. Use a seasoned cast iron skillet or a French Carbon Steel Pan. These pans are designed to sear hot and sear quick without sticking. A non-stick skillet will simply not get hot enough to produce a good browning sear.

    Storage

    Store any leftovers in an air tight container in the refrigerator. These pan fried chicken thighs will keep for 3 – 4 days. To reheat, use an air fryer or oven to keep the thighs crispy. To reheat in an air fryer, preheat to 370 degrees. Cook the thighs for 5 – 7 minutes. To reheat in an oven, preheat oven to 350 degrees. Place the thighs in an oven proof pan, a small sheet pan works great here. Heat for about 10 minutes or until warmed.

    Pan Fried Boneless Chicken Thighs with Lemon Cream Sauce

    Pan fried chicken thighs with rosemary white beans.

    What To Serve With It

    Make this easy meal even easier by serving these fried boneless chicken thighs with white canned white beans seasoned with rosemary. Or sour cream mashed potatoes would be a good choice here. Sprinkle with chopped parsley for presentation.

    More Easy Chicken Dinner Recipes

    • Wilted spinach salad with grilled chicken tenders in a salad bowl.
      Grilled Chicken Wilted Spinach Salad
    • Lemon garlic white wine sauce with chicken.
      White Wine Sauce With Chicken And Gremolata
    • Grilled chicken kabobs with pineapple salsa.
      Maple Glazed Grilled Chicken Kabobs
    • Rotisserie chicken soup served in a white bowl garnished with cilantro.
      Southwestern Rotisserie Chicken Soup – 30 Minute Weeknight Meal

    If you’re looking for more Chicken Recipes, don’t miss my Chicken Category. You’ll find lots of great ideas, including the most popular chicken recipe on my site for Chicken Mushroom Spinach Skillet. A crowd pleasing recipe easy enough for a weeknight meal and impressive enough for entertaining.

    If you liked this recipe, please leave a star ⭐⭐⭐⭐⭐ rating in the recipe card below and leave a comment. I always appreciate your feedback and hearing how everything went.

    And, don’t forget to subscribe to my newsletter for more delicious recipes and cooking tips. Make it a delicious day … every day.

    Pan fried chicken thighs served with lemon cream sauce and white beans.
    Print Recipe
    5 from 2 votes

    Pan Fried Boneless Chicken Thighs With Lemon Cream Sauce

    A one pot chicken dinner. Mouthwatering delicious and perfect for an easy weeknight meal.
    Prep Time10 minutes mins
    Cook Time10 minutes mins
    Total Time20 minutes mins
    Course: Main Course Chicken
    Cuisine: American
    Servings: 2
    Calories: 645kcal
    Author: Lea Ann Brown

    Ingredients

    • 4 boneless skinless chicken thighs slightly pounded to even out thickness
    • 2 tablespoons flour
    • salt and pepper to taste
    • 2 tablespoons vegetable oil
    • 1 cup chicken broth
    • 2 cloves garlic minced
    • ¼ teaspoon red pepper flakes
    • 2 tablespoons lemon juice
    • 2 tablespoons butter
    • ¼ cup heavy cream
    • chopped parsley for garnish.

    Instructions

    • Place chicken thighs on a cutting board. With a kitchen mallet, slightly pound the thighs to even out the thickness so they'll cook evenly. Sprinkle both sides with flour and salt and pepper to taste.
    • Heat a medium to large heavy skillet over medium high heat. Add the oil until hot and then add chicken thighs. Cook on both sides until nicely browned. About 4-5 minutes per side. Remove thighs to a plate and cover with the lid or foil to keep warm.
    • In a bowl, combine chicken broth, garlic, red pepper flakes and lemon juice, Add to the hot pan, scraping pan to collect all of the browned chicken bits that have collected on the pan. Simmer for 8-10 minutes.
    • Remove pan from heat and stir in butter and cream. When the butter has melted add the chicken back into the pot. Stir well to coat the chicken with the sauce. Serve immediately.

    Notes

    Store any leftovers in an air tight container in the refrigerator. These chicken thighs will keep for 3 – 4 days. To reheat, use an air fryer or oven to keep the thighs crispy. To reheat in an air fryer, preheat to 370 degrees. Cook the thighs for 5 – 7 minutes. To reheat in an oven, preheat oven to 350 degrees. Place the thighs in an oven proof pan, a small sheet pan works great here. Heat for about 10 minutes or until warmed.
    Use a gluten free all purpose flour to make this recipe gluten free. 

    Nutrition

    Calories: 645kcal | Carbohydrates: 12g | Protein: 46g | Fat: 46g | Saturated Fat: 28g | Cholesterol: 286mg | Sodium: 748mg | Potassium: 711mg | Fiber: 1g | Sugar: 2g | Vitamin A: 916IU | Vitamin C: 17mg | Calcium: 59mg | Iron: 2mg

    Pan Fried Boneless Chicken Thighs …It’s what’s for Dinner.

    Mexican Bison Steak Hoagie

    March 21, 2022 By Lea Ann Brown 1 Comment

    Bison steak and cheese sandwich with queso blanco

    This steak hoagie is made with tender shaved Bison New York Strip steak, caramelized onions, and roasted chile peppers. Drizzled with a lively queso, this steak and cheese sandwich a flavorful treat for lunch or dinner.

    Bison steak and cheese sandwich with queso blanco

    Bison is a leaner and healthier option to beef when planning a red meat dinner. Interested in more bison recipes, check out Boulder Beer Porter Bison Stew, Black Bean Chipotle Bison Chile, or this recipe for a Perfect Bison Burger.

    With a nod to the famous Philly Cheesesteak Sandwich, I’ve created a Colorado themed version that is sure to win your chile pepper loving heart.

    This steak hoagie is made using a Bison New York Strip steak that is seared, finished in the oven to medium rare, and then shaved into very thin slices.

    The rest is easy, building the sandwich using caramelized onions, roasted Pueblo chile peppers and drizzled with a tasty queso blanco cheese.

    Served on a toasted hoagie sandwich roll it’s a sandwich that’s not only delicious but wonderful with texture.

    This steak hoagie recipe will wow your dinner crew.

    My post has all the process shots, hints and tips for you to make the very best Steak sandwich in your home. Let's get started.

    Why You’re Going To Love This Sandwich

    • Bison is learner than beef and may be a healthier choice for steak if you’re looking to reduce calorie and fat intake.
    • You’re going to love the layers of flavors in this sandwich.
    • The combination of flavors is outstanding. Tender bison, sweet onions, spicy chile peppers and that creamy queso topping.
    • This steak hoagie is easy to make.

    Let’s get started.

    Ingredients You’ll Need

    Minimal ingredients and big on flavor, this is an easy recipe to make.

    Ingredients to make a steak and cheese sandwich.
    • Onion: Sweet or yellow onion.
    • Chile Peppers: To keep this recipe a Colorado themed recipe, I used roasted Pueblo Chile Peppers.
    • Steak: Two Bison New York Strip steaks.
    • Bread: Seek out hoagie rolls or Bolillo or Telera rolls. They two latter are rolls most commonly used to make Mexican torta sandwiches.
    Queso blanco cheese dip served with blue corn tortilla chips

    You’ll also need some Queso Blanco. Southwestern spices blended into American cheese that’s been heated to creamy bliss.

    Ingredient Subs and Swaps

    • Chile Peppers: If you don’t have access to Pueblo Chile Peppers, use fresh roasted Hatch Chile Peppers, or a can of whole chile peppers purchased from the Mexican aisle at the grocery store. Roasted Poblano Peppers are also an excellent choice for this sandwich.
    • Steak: Replace Bison New York strip steaks with Beef New York Strip Steaks. You can also use beef flank steak or skirt steak. Just sear and cut against the grain for thin shaved pieces.
    • Bread: Torta rolls which are labeled Bolillo or Telera rolls are readily available at our stores in Colorado. If you can’t find them, purchase Hoagie rolls.

    How To Make A Steak Hoagie (steak torta)

    sliced onions in a fry pan read to caramelize

    Step 1: Caramelize the onions. Heat a fry pan over medium high heat. Once the pan is hot, add two tablespoons neutral oil. Once the oil is shimmering, add the sliced onion rings. Turn heat down to low. Cook onions until they start to brown. Stirring often. This should take 15 – 30 minutes, depending how brown and caramelized you want them.

    How to sear bison steak
    • Step 2: Cook the Bison New York strip steaks. Preheat oven to 350 degrees. Season the steaks with salt and pepper. I also like sprinkling on some New Mexico Chile powder. Using an oven safe fry pan, heat the pan to medium high heat. Once the pan is hot, add neutral oil. Once the oil is shimmering, add the steaks. Keep heat to medium high and sear the steaks about two minutes per side, or long enough to get a good brown sear on each side. Then move the pan to the oven and cook for about eight minutes, or until an internal temperature of 135 is reached. Use a meat thermometer. Remove the steaks and tent for about ten minutes.

    Tip: Hot Pan, Cold Oil. The reason we heat the pan and then add the oil, is to quickly get the oil nice and hot before adding food. Once food hits that oil, you want to immediately hear it sizzle. If the oil isn’t hot enough to sizzle, the food will soak up the oil which will compromise taste and texture. How to tell if the oil is hot enough? It should appear to “shimmer”. You should be able to see fingers in the texture.

    Toasting bread to make a steak torta
    • Step 3: Toast the bread. Brush the torta rolls with olive oil. Get a grill pan nice and hot and place bread oiled side down in the hot pan. Watch them close, they’ll toast in no time. Set aside.

    Build that sandwich.

    • Using a very sharp knife, slice the steak as thin as you can possibly cut it. It should be so thin that it’s shaved. This will make the steak pieces easier to eat.
    • Place a good amount of sliced steak on each torta roll.
    • Top with onions and sliced peppers.
    • Drizzle with Queso Blanco and dig in.

    Pro Tips

    • About Cooking Bison: Let the bison steaks set at room temperature for about 30 minutes. Keep in mind, bison contains less fat than regular beef, requires less cooking time, and will be dry if over-cooked. If you're interested in learning more about the management of our American Buffalo and more recipes, visit the National Bison Association website. It's a great resource for nutrition, cooking tips and more.
    • Grill Pan: Use a stove-top grill pan to get those desirable grill marks when toasting bread. I’ve had my Le Creuset pan for years and use it regularly for indoor grilling.
    • Roasting Chile Peppers: I’m lucky to have a stash of preroasted Hatch and Pueblo chile peppers in my freezer. If you buy fresh peppers place them on a sheet pan and place the pan about five inches below the broiler. Turn them often until the chiles are charred. But not burnt. Remove the skin by using your fingers. Don’t run them under water … you’re washing away that smoky flavor. Remove top, seed pods and slice.
    What Kind Of Oil For Pan Frying?

    A neutral oil. Neutral oils are low in flavor. Canola oil is my choice because it’s easy to find and the smoking point is around 400 degrees. Meaning you can get it nice and hot before it smokes and burns. Vegetable oil, sunflower oil and safflower oil are also good choices. To learn all about oils and cooking I like this article from Bon Appetit.

    What’s The Difference Between a Hoagie And A Torta

    In my humble opinion, it’s all in the name. It’s a cultural name for a sandwich served on a sandwich roll from a certain region. And the bread used to make the sandwich. A Hoagie or Hero roll is used to make a hoagie, and a torta uses rolls labeled Bolillo or Telera rolls.

    What Should I Serve With A Steak Hoagie?

    Mexican Mac and Cheese, Instant Pot Refried Beans, or if you’re looking for something lighter, take a look at this Southwestern Salad with Black Beans.

    What are other fillings I can use for this sandwich?

    Smashed avocado, refried beans, slices of pickled jalapeno, sliced tomato, sliced avocado, shredded iceberg, lettuce and you can substitute a drizzle of salsa for the Queso Blanco.

    Equipment You’ll Need

    • Oven Proof Fry Pan. A cast iron skillet will work to cook the steaks and finish in the oven. Also consider a French Steel (or carbon steel pan) … I prefer it over cast iron because it’s lighter, naturally non-stick, the handle doesn’t get hot when using it stovetop and it’s preferred by professional chefs. A carbon steel pan is an ideal choice when needing a stovetop to oven pan.
    • Digital Real Meat Thermometer: These thermometers are work horses when it comes to cooking meat to desired doneness.
    • Grill pan or griddle for toasting that bread.

    Recipe Steak Hoagie

    Bison steak sandwich with chile peppers, onions and queso blanco

    I hope you give this Western version of a Steak Hoagie recipe a try. It’s a fiesta of flavors and a sandwich you’re sure to fall in love with.

    And if you love using chile peppers as much as we do, don’t miss this post dedicated to Hatch Green Chile Recipes.

    More Recipes You Might Like

    • Toasted Pueblo Chile Chicken Sandwich
    • Party Sub Club Sandwich
    • Toasted Ham and Manchego Sandwich

    And if you’re looking for more sandwich recipe ideas, don’t miss my Sandwich Category. You’ll find some fun ideas, including the most popular sandwich recipe on my site for Sloppy Joes For A Crowd.

    If you liked this recipe, please leave a star ⭐⭐⭐⭐⭐ rating in the recipe card below and leave a comment. I always appreciate your feedback and hearing how everything went.

    And, don’t forget to subscribe to my newsletter for more delicious recipes and cooking tips. Make it a delicious day … every day.

    Bison steak and cheese sandwich with queso blanco
    Print Recipe
    5 from 1 vote

    Bison Steak Hoagie with Cheese, (Mexican Steak Torta)

    This steak and cheese sandwich is made with tender shaved bison New York Strip steak, caramelized onions, roasted chile peppers and drizzled with lively queso blanco.
    Prep Time15 minutes mins
    Cook Time15 minutes mins
    Course: Main Course Sandwiches
    Cuisine: American/Mexican
    Servings: 4
    Calories: 502kcal
    Author: Lea Ann Brown

    Equipment

    • Oven Proof Fry Pan French Steel Pan Works Great

    Ingredients

    • 1 ½ pounds Bison New York Strip Steak
    • salt and pepper to taste
    • 4 Tablespoons neutral oil Divided. Canola oil works well here
    • 2 large onions sweet or yellow, sliced
    • 4 Colorado Chile Peppers roasted, peeled and sliced
    • 2 Torta Rolls or Hoagie Rolls
    • 4 Tablespoons Queso Blanco to drizzle

    Instructions

    • Preheat oven to 350 degrees.
    • Heat a fry pan over medium high heat. Once the pan is hot, add two tablespoons neutral oil. Once the oil is shimmering, add the sliced onion rings. Turn heat down to low. Cook onions until they start to brown. Stirring often. This should take 15 – 20 minutes. Remove onions from pan and set aside.
    • Season the steaks with salt and pepper. I also like sprinkling on some New Mexico Chile powder. Using an oven safe fry pan, heat the pan to medium high heat. Once the pan is hot, add the remaining two tablespoons of canola oil. Once the oil is shimmering, add the steaks. Keep heat to medium high and sear the steaks about 2 minutes per side. Or long enough to get a good brown sear on each side. Then move the pan to the oven and cook for about 8 minutes or until an internal temperature of 135 is reached. Use a meat thermometer. Remove the steaks and tent for about 10 minutes.
    • In the meantime, toast the bread. Brush the torta rolls with olive oil. Get a grill pan nice and hot and place bread oiled side down in the hot pan. Watch them close, the'll toast in no time. Set aside.
    • Build that sandwich. Using a very sharp knife, slice the steak as thin as you can possibly cut it. It should be so thin that its shaved. This will make the steak pieces easier to eat. Place good amount of sliced steak on the torta roll. Top with onions and sliced peppers. Drizzle with Queso blanco and dig in

    Notes

    This recipe makes two very large sandwiches. Cut each sandwich in half to serve 4 people.
    Roasting Chile Peppers: I’m lucky to have a stash of pre-roasted Hatch and Pueblo chile peppers in my freezer. If you buy fresh peppers place them on a sheet pan and place them about 5 inches below the broiler. Turn them often until the chiles are charred. But not burnt. Remove the skin by using your fingers. Don’t run the under water, you’re washing away that smoky flavor. Remove top, seed pods and slice.
    Queso Blanco: Queso blanco is super easy to make. Please take a look at my recipe for Queso Blanco Dip.
    About Cooking Bison: Let the bison steaks set at room temperature for about 30 minutes. Keep in mind, bison contains less fat than regular beef, requires less cooking time, and will be dry if over-cooked. If you’re interested in learning more about the management of our American Buffalo and more recipes, visit the National Bison Association website. It’s a great resource for nutrition, cooking tips and more.
    Grill Pan: Use a stove-top grill pan or a griddle to get those desirable grill marks when toasting bread. 
     

    Nutrition

    Calories: 502kcal | Carbohydrates: 27g | Protein: 45g | Fat: 23g | Saturated Fat: 5g | Polyunsaturated Fat: 5g | Monounsaturated Fat: 11g | Trans Fat: 1g | Cholesterol: 123mg | Sodium: 658mg | Potassium: 843mg | Fiber: 3g | Sugar: 6g | Vitamin A: 109IU | Vitamin C: 11mg | Calcium: 112mg | Iron: 6mg

    Bison Steak Hoagie and Cheese Sandwich ( Mexican Steak Torta ) …. It’s What’s For Dinner

    Lemon Ginger Chicken Soup

    March 16, 2022 By Lea Ann Brown 33 Comments

    A bowl of lemon ginger chicken soup.

    This Lemon Ginger Chicken Soup Recipe is a classic Julia Child recipe that you owe it to yourself to try. Elegant, healthy and light, this is a soup will carry your through Winter and into those cool Spring days. Simmering chicken breasts and thighs in chicken stock deepens the robust chicken flavor. And lemon and ginger brighten the flavors. You’ll love this recipe for it’s pure simplicity.

    If you’re looking for a much lighter and healthier version of classic Chicken Noodle Soup, you’ve got to give this one a try.

    Lemon ginger chicken soup with a bowl of oyster crackers.

    Why This Lemon Ginger Chicken Soup Works

    • A Chicken Soup with no noodles? Yes, it does exist. This soup is fresh in flavor and light in calories and one that will have you asking for seconds and thirds. 
    • Warming and comforting, this Lemon Ginger Chicken Soup Recipe delivers a rich chicken flavored broth scented with ginger, lemon and garlic. An easy chicken soup recipe that’s rewarding and healthy. This is one amazing bowl of soup.
    • Most lemon chicken soup recipes include orzo or rice for a Greek flare. This recipe stays clean, fresh and super heathy using just chicken, spices and vegetables.
    • There’s an long-standing rumor going round that soups like this help with the Winter cold sniffles.
    • A recipe from The Master, Julia Child. It’s bound to reliable and delicious.

    Table of contents

    • Why This Lemon Ginger Chicken Soup Works
    • How To Serve It
    • Variations:
    • How To Season Soup For A Brighter Flavor
    • Questions You May Have
    • Storing and Freezing
    • More Chicken Soup Recipes

    Let’s take a look.

    Ingredients You’ll Need

    Ingredients to make lemon ginger chicken soup.
    • Chicken Broth: Homemade is always preferred for maximum flavor, but store purchased will work well here.
    • Mirepoix: Onion, celery and carrots
    • Parsley
    • Chicken: Both boneless skinless chicken breast and bone-in skin on thighs. The bones and skins will add a deep layer of flavor.
    • Lemons: Slices and zest.
    • Seasonings: Ginger, garlic and bay leaves.

    Pro Tip: Freeze Ginger. Keep that knob of ginger in the freezer. Whenever you need a small amount for any recipe, just remove it and use a zester or microplane zester to acquire the amount you need and then return the rest back to the freezer for future use. You don’t even need to peel the ginger. EASY and practical.

    How To Make Lemon Ginger Chicken Soup, It’s Easy!

    Cooking chicken in Dutch oven for lemon ginger chicken soup.
    1. Step 1: Place chicken, 2 whole garlic cloves, bay leaves, fresh ginger, salt and pepper in a 6 quart Dutch oven.
    Cooking whole chicken breasts and chicken thighs in chicken broth.
    1. Step 2: Add chicken broth and bring to a boil over medium-high heat; reduce to low and simmer with lid slightly ajar for 45 minutes.
    Making mirepoix for chicken soup with chopped carrots, celery and onion.
    1. Step 3: Make the Mirepoix. Mirepoix is a a classic French technique where chopped celery, onions and carrots are sauteed, then added to soups and sauces as an aromatic for a base layer of flavor. Practice your knife skills here and cut the vegetables as close to the same size as you can. Saute the veggies in neutral oil or olive oil at a low heat until just starting to become tender and sweet.
    Shredded chicken using to forks.
    1. Step 4: Shred the Chicken: Remove chicken from broth and once it’s cool enough to handle, shred chicken thigh meat from bones and discard the skin. Shred the chicken breast meat. Find the two cloves of garlic in the broth and using the back of a fork, smash them against the side of the Dutch Oven.
    Lemon Ginger Chicken Soup in a Red Le Creuset Dutch Oven.
    1. Step 5: Remove the lemon slices to a plate. Add the sauteed vegetables, lemon zest and shredded chicken back into to cooking liquid. Add 2 cups water. Cover and reduce heat to medium, and simmer approximately 20 minutes.

    How To Serve It

    Keep things light and healthy by serving this soup with a tossed salad. Take a look at this recipe for Baby Kale Salad or this beautiful Hearts of Palm Salad.

    Variations:

    Use leftover Thanksgiving Turkey to make this soup. It will work like a charm.

    How To Season Soup For A Brighter Flavor

    As I learned in Culinary School, any type of acid will brighten the flavors of any dish. An example is a splash of vinegar when making tomato based dishes. Vinegar will take the bite out of a too harsh tomato flavor.

    For this soup, lemon zest acts as the acid to lift the flavors of the soup to brighter level. 

    Questions You May Have

    Do You Cook The Chicken Before Adding It To The Soup?

    No, that’s where the flavor comes from. Adding raw chicken to the broth intensifies the chicken flavor.

    Is It Best To Cook Chicken Soup Covered or Uncovered

    In this case, we’re going to cover the Dutch oven to simmer the soup. This will keep flavor at a maximum, and will keep the broth from evaporating. Resulting in a brothier soup.

    Can I Use Pre-cooked Chicken?

    Adding raw chicken to this recipe is what brings the flavor to the broth. If you want to use pre-cooked chicken, I would suggest a rotisserie chicken.

    Storing and Freezing

    • Once the soup has cooled, store in an airtight container in the refrigerator for up to 4 days. To reheat simply use the microwave or stovetop.
    • This soup will also freeze well. Again, allow the soup to cool, then place in several airtight small containers for individual servings, or a large container. This soup will keep in the freezer for up to three months. To reheat, allow the soup to thaw overnight in the refrigerator and then use microwave or stove top to reheat.

    Lemon Ginger Chicken Soup Recipe

    Lemon Ginger Chicken Soup in  a white lattice bowl.

    It’s perfect in every way. Delicately flavored broth with ginger, bay leaf and garlic. Carrot, celery, onions are brightened with lemon zest. Tender chicken that soaks up every bit of that flavor…and the rest is perfect and elegant history.

    ‘Tis the season to transition from thick comforting stews to lighter fresh soups. This chicken soup with lemon brings it on.

    I hope you give this lemon chicken soup recipe a try. It’s a very special recipe.

    More Chicken Soup Recipes

    • Southwest chicken soup with hominy and potatoes.
      Sopa Ranchera, Southwest Chicken Soup
    • White Wine Chicken Potato Vegetable Soup
    • Creamy chicken tortilla soup with rotel tomatoes.
      Creamy Chicken Tortilla Soup with Rotel
    • Chicken cheese soup with poblano peppers garnished with tortilla strips
      Cheddar Cheese Soup with Chicken and Poblano Peppers

    And if you’re soup fans like us, don’t miss my Soup Category. You’ll find lots of great recipes, including the most popular chicken soup recipe on my site for creamy Cheddar Cheese Soup with Chicken and Poblano Peppers.

    If you liked this recipe, please leave a star ⭐⭐⭐⭐⭐ rating in the recipe card below and leave a comment. I always appreciate your feedback and hearing how everything went.

    And, don’t forget to subscribe to my newsletter for more delicious recipes and cooking tips. Make it a delicious day … every day.

    A bowl of lemon ginger chicken soup.
    Print Recipe
    5 from 6 votes

    Lemon Ginger Chicken Soup

    Delicately flavored broth with ginger, bay leaf and garlic. Carrot, celery and onion are brightened with lemon zest.
    Prep Time30 minutes mins
    Cook Time30 minutes mins
    Course: Soup, Stews and Chilis
    Cuisine: American
    Servings: 8
    Calories: 270kcal
    Author: Lea Ann Brown

    Ingredients

    • 1 ½ pound chicken breasts boneless, skinless
    • 1 pound chicken thighs skin on, bone-in
    • 8 cups chicken broth
    • 1 Tablespoon ginger grated
    • 2 bay leaves
    • 2 Tablespoon neutral oil canola works good here. You can also use olive oil.
    • 1 ½ cups onion chopped, about 1 large onion
    • 2 cups celery chopped, about 4 – 5 stalks, plus leaves
    • 2 cups carrots peeled and chopped, about 3 – 4 carrots
    • 2 cloves garlic peeled
    • 6 slices Lemon from one of the lemons you zested.
    • 2 cups water
    • 4 teaspoons lemon zest zest from 2 lemons
    • salt & pepper
    • Parsley or basil to garnish

    Instructions

    • Place chicken, 2 whole garlic cloves, bay leaves, sginger, salt and pepper, and chicken broth in a Dutch oven. Bring to a boil over medium-high heat; reduce to low and simmer with lid ajar for 45 minutes.
    • Make the mirepoix: Chop all of the vegetables, zest two lemons, and slice one of the lemons that you used for zesting.
    • Heat a large skillet over medium high heat. Once the skillet is hot, add the oil. Once the oil is hot, add onion, celery, carrot and lemon slices. Saute over medium heat for 5 – 6 minutes or until tender. Stir occasionally.
    • Remove chicken from broth and once it's cool enough for handling, shred chicken thigh meat from bones and discard skin. Shred the chicken breast meat. Find the two cloves of garlic in the broth and using the back of a fork, smash them against the side of the Dutch Oven.
    • Add the sauteed vegetables, lemon zest and shredded chicken back into to cooking liquid. Add 2 cups water. Cover and reduce heat to medium, and simmer approximately 20 minutes.
    • Remove bay leaves. Taste and adjust for seasonings (salt and pepper) and serve.
    • Garnish with parsley and some of the sliced lemon.

    Notes

    Pro tip; Keep ginger in the freezer. Whenever you need some, use a microplane zester to get the amount you need. You don’t even need to peel the ginger. Easy! For this recipe, zest a generous tablespoon of ginger instead of peeling and slicing.

    Nutrition

    Calories: 270kcal | Carbohydrates: 9g | Protein: 29g | Fat: 13g | Saturated Fat: 3g | Cholesterol: 110mg | Sodium: 1030mg | Potassium: 783mg | Fiber: 2g | Sugar: 3g | Vitamin A: 5176IU | Vitamin C: 27mg | Calcium: 49mg | Iron: 1mg

    Lemon Ginger Chicken Soup … It’s What’s For Dinner

    Easy Pistachio Crusted Rack of Lamb

    March 8, 2022 By Lea Ann Brown 12 Comments

    Pistachio crusted rack of lamb served with puy lentils.

    Pistachio crusted rack of lamb is tender, juicy and a restaurant quality, show stopping dinner. It’s easier than you think. Using a simple rack of lamb marinade this recipe is over the top delicious. I’ll walk you through the process.

    Looking for more special occasion show stoppers? Take a look at my recipe for Chicken Galliano. A very special recipe using Galliano Liqueur.

    Pistachio crusted lamb chops with lentils and winter squash.

    Table of contents

    • What You Can Expect From This Recipe
    • What Is A Frenched Rack of Lamb?
    • Ingredients You’ll Need
    • Preparing The Lamb Marinade
    • Pan Searing The Rack Of Lamb
    • Preparing Rack Of Lamb For The Pistachio Crust
    • Cooking Rack Of Lamb In The Oven
    • Questions You May Have
    • Serving and Storage
      • More Lamb Recipes

    What You Can Expect From This Recipe

    A rack of lamb is so impressive in appearance, and a process I’ve always assumed reserved for experienced chefs. Probably fussy, probably difficult.

    For this recipe, which I learned in Culinary School, we’re using a rack of lamb marinade with rosemary and thyme.

    We’ll sear the lamb stove top, then slather both sides with Dijon mustard. The mustard adds flavor and a tasty coating for the panko bread crumb and ground pistachio mixture to stick to the meat.

    We’ll then finish the lamb in the oven.

    This rack of lamb with pistachio crust is a wonderful special occasion or date night meal that’s straightforward and easy to prepare. A timeless restaurant quality meal.

    What Is A Frenched Rack of Lamb?

    In school we prepped and Frenched our own rack of lamb. Which means to clean the bones using the “frenching” method. It truly was a labor of love, and a very difficult task.

    A Frenched rack of lamb means to strip meat and membrane away from the bone to give it a clean appearance. A boning knife is used to complete this task.

    A rack of lamb that’s been prepared this way is the same cut of meat used to cut Lollipop Lamb Chops.

    Our knife skill training at school was extensive and I’m very glad for that. However my boning knife and I still aren’t speaking over the whole ordeal. Here’s a link from Serious Eats if you’re interested in learning Knife Skills, How to Clean and French a Lamb Rack.

    Pro Tip: Purchase a rack of lamb that has already been Frenched by your butcher. You’ll gladly pay those few extra dollars to save an hours worth of tedious work.

    Ingredients You’ll Need

    Ingredients to make pistachio crusted rack of lamb.
    • 1 Frenched rack of lamb.
    • Pistachios: Purchase shelled pistachios that are roasted.
    • Spices: Dried rosemary and thyme combined with olive oil makes the best lamb marinade = easy.
    • Dijon Mustard: Dijon brings a beautiful flavor, plus acts as the “glue” to hold the panko bread crumb and ground pistachio mixture. An added benefit of mustard, is that it also tenderizes the meat.

    Tip: When calculating how much rack of lamb will feed your crowd, when sliced, one rack of lamb has 8 chops. Plan on 2 chops per person. Although the chops are small, the side dishes will fill in to make an ample meal for each person.

    Preparing The Lamb Marinade

    Best marinade for rack of lamb.
    1. Step 1: The best rack of lamb marinade! Why? it’s easy and the simple ingredients infuse traditional flavor into the meat. Rosemary, thyme, olive oil and salt and pepper.
    Marinade for rack of lamnb.
    1. Step 2: Pat the lamb dry, then coat with the marinade mixture. Marinate in the refrigerator for two hours. EASY!

    Pan Searing The Rack Of Lamb

    Pan seared rack of lamb.
    1. Step 3: Bring the lamb to room temperature. Heat a skillet over medium high heat. Add neutral oil such as vegetable or canola oil. When oil is hot, add lamb and sear on each side until you get a good brown crust. Remove from heat.

    Preparing Rack Of Lamb For The Pistachio Crust

    Pistachio crusted dijon mustard rack of lamb
    1. Step 4: When the lamb has cooled slightly smear generously with Dijon mustard.
    Grinding pistachios and panko bread crumbs in a mini food processor.
    1. Step 5: In the meantime, in a food processor add the pistachios and pulse until rough chopped.
    2. Step 6: Add Panko bread crumbs and some butter. Gently pulse again until mixed.

    How to crust a rack of lamb with panko bread crumbs and pistachios.
    1. Step 7: Using your hands, press the pistachio crust mixture onto the mustard coated lamb until well coated.

    Cooking Rack Of Lamb In The Oven

    Rack of lamb coated in ground pistachios.
    1. Step 8: Roast the lamb in the oven until thermometer reaches desired doneness. (See cooking chart below)

    Questions You May Have

    Should You Sear Lamb Before Roasting?

    Do you really HAVE to? If you want the best end result in texture and flavor, yes searing lamb before oven roasting is a smart thing to do. Searing any meat, adds a caramelized crust which brings flavor and helps to keep juices in while oven roasting. Be sure to bring lamb to room temperature (30 minutes to an hour) before searing.

    What Cut Of Meat Is Rack Of Lamb?

    Rack of lamb is a section of ribs which usually is purchased in a set of 8 attached ribs.

    What Temp To Cook Lamb?

    Pull time: 135 degrees F = Medium rare, final internal temperature 145 degrees.
    Pull time: 150 degrees F = Medium well, final internal temperature 160 degrees
    Pull time: 160 degrees F = well done, final internal temperature 170 degrees.
    Source: American Lamb
    Since the internal temperature of cooked lamb will rise 5 – 10 degrees during the rest period, adjust accordingly by pulling the lamb out of the oven when its 10 degrees lower than desired doneness.

    How Long Does It Take to Roast A Rack Of Lamb?

    In a 400 degree pre-heated oven, roast time will vary because oven temperatures are not always reliable. But you can estimate about a 20 – 30 minute cook time.

    How Do You Slice A Rack of Lamb?

    Lay the roasted rack of lamb on a cutting board with the meat side nearest to you. Using a sharp knife, simply slice through the meat in between the ribs.

    Pro Tip: It’s important to use a digital read meat thermometer for this recipe. Oven temperatures vary, so keeping track of the internal temperature is important to insure a perfect roast.

    Serving and Storage

    To copy-cat our meal at Culinary School, I served this with puy lentils and a variety of roasted squash.

    A fancy feel potato dish such as Potatoes Dauphinoise is a good choice here, or perhaps Hericot Vert in Dijon Mustard Cream Sauce. An Accompaniment Salad would make this more of a Spring recipe.

    Store any left over lamb chops well sealed in the refrigerator for up to 5 days. I like to reheat them in a 300 degree oven or a toaster oven to keep the crunchy texture.

    Pistachio Crusted Rack of Lamb

    Two lamb chops served with lentils and roasted squash.

    I hope you give this rack of lamb with pistachio crust a try. It’s juicy, tender and absolutely delicious. Cooked in the oven, it’s an easy recipe to make with a special fancy restaurant feel. A great recipe for any special occasion.

    And to learn more about lamb, I recommend taking a look at this web site for The American Lamb Board.

    Colorado has a strong ranching heritage and lamb plays a big part in our history. Colorado Lamb is highly sought after due to its quality, and consistency in flavor and tenderness. The majority of lamb are free range, grazing on grass, brush and sage in the foothills of the Rocky Mountains. And even graze in Colorado Vineyards. Colorado lamb is hormone and antibiotic free.

    Lamb raised and imported from New Zealand and Australia are smaller in size that American raised lamb, and bring with it a gamier flavor. Please support local. Ask your butcher for Colorado raised lamb.

    More Lamb Recipes

    • Grilled Lamb Kebab Salad served with arugula.
      Grilled Lamb Salad with Arugula and Creamy Lemon Vinaigrette
    • Lamb lollipops served over white beans drizzled with red wine reduction sauce.
      Pan Seared Lollipop Lamb Chops with Red Wine Sauce and White Beans
    • Lamb sliders with mint and sweet tomato chutney.
      Lamb Sliders with Mint and Sweet Tomato Chutney
    • Spicy lamb meatballs on a crudite platter.
      Spicy Lamb Meatballs
    Pistachio crusted lamb chops with lentils and winter squash.
    Print Recipe
    5 from 6 votes

    Dijon and Pistachio Crusted Rack of Lamb

    Pistachio Crusted Rack of Lamb. A rack of lamb is seared, then coated with Dijon Mustard and a crunchy layer of a ground pistachios and bread crumbs. Roasted in the oven until tender and juicy gives you a restaurant quality dinner. Easier than you think and impressive.
    Prep Time2 hours hrs
    Cook Time40 minutes mins
    Total Time2 hours hrs 40 minutes mins
    Course: Main Course Lamb
    Cuisine: French
    Servings: 4
    Calories: 260kcal
    Author: Lea Ann Brown

    Ingredients

    • 1 pound Rack of Lamb 8-ribs, Frenched
    • 2 tablespoon fresh Rosemary leaves or 1 teaspoon dried rosemary
    • 2 tablespoon Fresh Thyme leaves or 1 teaspoon dried thyme leaves
    • 1 tablespoon Olive oil
    • Salt and Pepper to taste
    • ¼ cup shelled pistachios
    • ¼ cup Panko bread crumbs
    • 2 tablespoons vegetable oil
    • 1 tablespoon unsalted butter softened
    • 2 tablespoons Dijon mustard

    Instructions

    • In a small bowl, mix together the rosemary, thyme and olive oil.
    • Pat the rack of lamb dry with paper towels. Salt and pepper both sides of the rack of lamb and then using a basting brush, coat the the olive oil herb mixture all over the lamb. Place the rack of lamb on a dinner plate, cover with plastic wrap and let marinade in refrigerator for 2 hours. 
    • Bring to room temperature before cooking. (let set at room temperature for at least 30 minutes, preferably 1 hour)
    • Preheat oven to 400 degrees.
    • In the meantime, pulse the pistachios in a food processor until coarsely chopped. Add the softened butter and bread crumbs and pulse until just mixed. 
    • Heat a skillet over medium high heat. Add the vegetable oil. When oil is hot sear lamb on both sides until browned.
    • With a pastry brush, coat the lamb with the Dijon mustard. Pat the pistachio mixture onto the lamb with your hands until well coated.
    • Place the rack of lamb in a roaster. Roast in oven until thermometer reads to desired doneness.
    • Remove from oven and tent with foil and let rest for 10 minutes. Slice the chops into 4 servings. Two chops per person. You can either cut them into single chops or cut so that two chops are left together.

    Notes

    It’s important to use a meat thermometer for this recipe. Over temperatures vary, so keeping track of the internal temperature is important to insure a perfect roast.
    Do I have to sear rack of lamb before roasting? If you want the best end result in texture and flavor, yes searing before oven roasting is a smart thing to do. Searing any meat, adds a caramelized crust which brings flavor and helps to keep juices in while oven roasting. Be sure to bring lamb to room temperature (30 minutes to an hour) before searing.

    Rack of Lamb Cooking Temperature

    • Pull time: 135 degrees F = Medium rare, final internal temperature 145 degrees.
    • Pull time: 150 degrees F = Medium well, final internal temperature 160 degrees
    • Pull time: 160 degrees F = well done, final internal temperature 170 degrees.
    • Source: American Lamb

    Nutrition

    Calories: 260kcal | Carbohydrates: 15g | Protein: 5g | Fat: 21g | Saturated Fat: 9g | Cholesterol: 7mg | Sodium: 143mg | Potassium: 307mg | Fiber: 5g | Sugar: 1g | Vitamin A: 1140IU | Vitamin C: 34.1mg | Calcium: 120mg | Iron: 4.8mg

    If you liked this recipe, please leave a star ⭐⭐⭐⭐⭐ rating in the recipe card below and leave a comment. I always appreciate your feedback and hearing how everything went.

    And, don’t forget to subscribe to my newsletter for more delicious recipes and cooking tips. Make it a delicious day … every day.

    Rack of Lamb with Pistachio Crust … It’s what’s for Dinner.

    This recipe was first published October of 2017 and republished March 2022 with new photos and step by step instructions.

    « Previous Page
    Next Page »

    I'm Lea Ann

    Welcome to my Colorado kitchen. If you're a fan of rustic homestyle cuisine, you've come to the right place. I'm a Culinary School Grad with a passion to inspire you to cook as often as you can. I offer reliable, approachable and easy to follow recipes. So grab that skillet and let's cook.

    More about me
    Prosecco Christmas Cocktail.

    Reader Favorites

    • Super Moist Cheesy Cornbread with Creamed Corn
    • Flemings steakhouse macaroni and cheese in a white bowl.
      Flemings Steakhouse Mac and Cheese
    • Layered Mexican Casserole in a 9 x 13 pyrex dish with ground beef and corn tortillas, garnished with tomatoes and cilantro
      Mexican Casserole with Ground Beef and Corn Tortillas
    • Beef Tagliata, thin sliced flank steak served over arugula and cherry tomatoes.
      Beef Tagliata (Italian Steak)
    • Fried corn tortilla quesadilla topped with a fried egg.
      Crispy Ham and Cheese Corn Tortilla Quesadillas
    • Spinach chicken mushroom skillet dinner.
      Chicken Mushroom and Spinach Skillet

    Cozy Winter Comfort Food

    • Chicken Fajita Pasta in a large skillet.
      Creamy Chicken Fajita Pasta
    • Spicy meatloaf made with sofrito.
      Spicy Sofrito Meatloaf, The Secret Ingredient For Ultimate Flavor
    • Hamburger potato soup served in an orange bowl.
      Old Fashioned Hamburger Potato Soup
    • Pork tenderloin tacos with guajillo chile sauce.
      Pork Tenderloin Tacos In Chile Guajillo Sauce

    Footer

    • Contact
    • About
    • Privacy Policy
    • Accessibility Statement
    • ↑ back to top

    Copyright © 2024 Cooking on the Ranch • Powered by Feast+

    Rate This Recipe

    Your vote:


    A rating is required
    A name is required
    An email is required